
How to Write and Update EpsteinWiki KB Articles
This guide starts at the beginning. You will learn to sign in, find a knowledge base article, write or update it, add links, enter metadata and keywords, choose KB categories, add a featured image, and check the result.
Use the Knowledge Base article area for every task in this guide. Articles are the wiki entries readers find in the knowledge base. The WordPress dashboard is the private work area where contributors edit them.
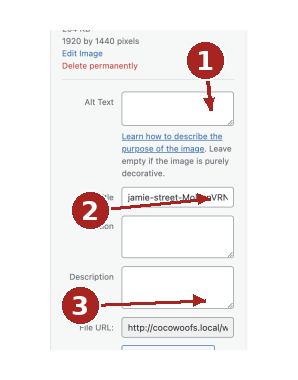
About the pictures. Numbered arrows identify controls in official documentation screenshots. These are examples, not captures of the EpsteinWiki dashboard. Teaching diagrams are labeled separately. Plugin versions and permissions can change the wording or position of controls.
First assignment. Complete one new article as a draft and have the wiki editor check it before you publish. For an existing live article, arrange review before applying public changes if review is needed.
Finding a section. Use the PDF bookmarks or the contents on the next page. The web version has the same instructions.
Prepare your material and learn basic terms
Before you open WordPress, have your article text, verified source links, evidence IDs, meta description, keywords, and approved featured image ready. Keep a working copy of the text outside WordPress so you can recover it if your connection fails.
Click means press the mouse button once on a control. Scroll means move down or up a page. Highlight means drag across text to select it. Paste means insert something you copied.
Dashboard is the private editing area. Editor is the screen where you change one article. Sidebar is a narrow column of settings. Panel is one expandable section in that column.
Block is one piece of content, such as a paragraph, heading, image, or list. Media Library stores uploaded pictures. Featured image is the article’s designated main image.
Draft is unpublished work. Preview shows how work will look. Published means readers can access the article. Update applies changes to a published article.
URL is a web address. Slug is its final identifying part. Metadata describes the article for systems such as search engines. Alt text describes an image for accessibility.
Check your work. Keep this guide open in one browser tab and WordPress in another. Work on one article at a time.
Sign in and find Knowledge Base

- Open your web browser. Click the address bar at the top, type https://epsteinwiki.com/wp-admin/, and press Enter.
- If a sign in form appears, enter your own assigned username or email address in the first box and your password in the password box. Click Log In. Do not use another contributor’s account.
- After sign in, look for the vertical dashboard menu on the left. Click or point to Knowledge Base. A submenu should show article options.
- Click All Articles. If the menu has been renamed, choose the wiki’s knowledge base article list. If it is missing entirely, ask the wiki editor to check your account access.
- Keep this account screen separate from the public wiki. Opening a public page does not automatically open its editor.
Check your work. You should see a list of KB article titles and a search box. Stay in this area for new articles and updates.
Search for an article and open it

- In Knowledge Base → All Articles, click the search box above the article list. Type the subject’s name or a distinctive word.
- Click Search in Articles or the equivalent search button. Read the results. Try an alternate spelling or documented alias if the first search finds nothing.
- If the article exists, click its title to open the full editor. You may also hover over the title and click Edit when that option appears. Quick Edit is only for limited settings.
- If it does not exist, click Add New Article. Use the ordinary article button. The separate Custom Link Article option creates a different kind of item.
- For an existing article, also open its public page in another browser tab. Read it before changing anything and note the current URL.
Check your work. You should be editing one KB article, or looking at a blank KB article editor.
Recognize the editor and enter a title
You may see the block editor, with individual content blocks and plus buttons, or the classic editor, with a large writing box and a formatting toolbar. Both can edit a KB article. Continue in the layout already enabled on the site.
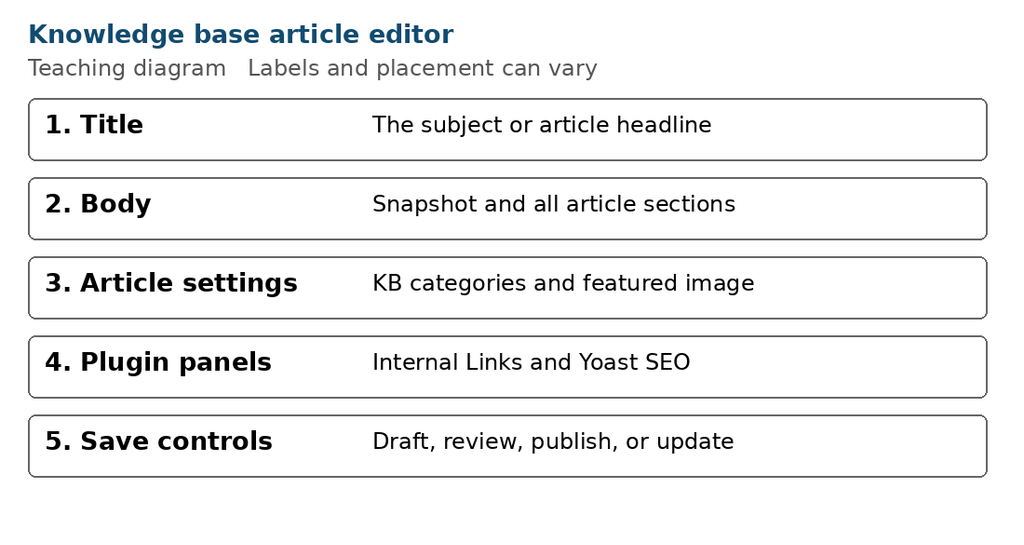
- Find the large title field near the top. For a new article, click it and type the agreed title. The subject name or a clear descriptive title usually belongs here.
- Click outside the title field. Find the main writing area beneath it. The title field and article body are separate.
- If settings are hidden in the block editor, click the settings or sidebar icon near the upper right. Choose the Article tab for whole article settings and Block for the selected content block.
- For an update, preserve the existing title, URL, and template unless the wiki editor has agreed to change them.
Check your work. The headline belongs in the title field. Snapshot and the remaining sections belong in the body.
Paste or write the article body
- Open your prepared article text. Select the body text without the duplicate title or private notes. Copy it with Ctrl+C on Windows or Command+C on a Mac.
- Return to WordPress. Click the empty body area beneath the title. Paste with Ctrl+V or Command+V. Paste once, then check the result.
- If you are writing from scratch in the block editor, click the first empty paragraph and type. Press Enter to begin the next paragraph.
- Check whether the pasted text kept its headings, bullets, and links. Markdown symbols such as ## or [text](URL) may remain literal text. Do not assume that pasting converts them.
- If unwanted fonts or spacing came with the paste, undo it first. Paste as plain text with Ctrl+Shift+V or Command+Shift+V where supported, then rebuild the formatting.
- For a new article, click Save Draft after you have entered the title and body. Wait for Saved or another success message. A draft save is not a publication.
Check your work. Read the first and last paragraphs. Confirm that the article was pasted once and that no intended section is missing.
Make headings and separator lines
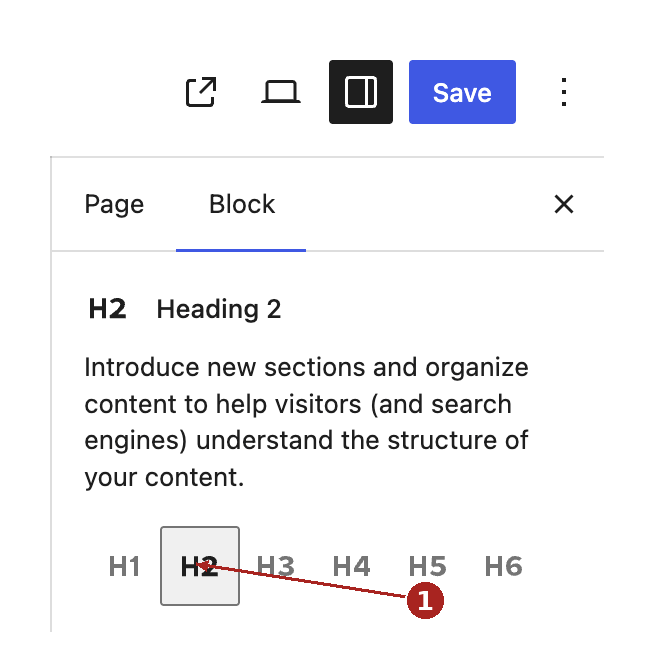
- For an existing block editor paragraph such as Snapshot, click inside it. Open its block type control in the toolbar and select Heading.
- Choose H2 for a main section. Depending on the version, the heading level is in the block toolbar or the Block settings sidebar. H3 is for a subsection inside an H2 section.
- To add a new heading, click a plus button, search for Heading, select it, and type the section name. Making a paragraph bold does not turn it into a real heading.
- To make a separator, place the cursor between sections, add a block with the plus button, search for Separator, and select it. You can also type /separator in an empty block and choose the result.
- Keep one article title in the title field. Begin the body with an H2 Snapshot. Preserve the established template and use real separator lines between major sections.
Check your work. Click a section heading again. Its type should be Heading and its level H2. Preview should show a real line between major sections.
Make bullets and use the classic editor
Block editor bullets. Click an empty block, use the plus button, search for List, and choose it. Select the bulleted list option if a numbered list appears. Type the first item and press Enter for the next. Press Enter again on an empty last item to leave the list.
Bold and italics. Highlight only the words you want to change. Click B for bold or I for italics. Use emphasis sparingly and keep normal paragraph text readable.
Classic editor writing. Use the Visual tab for normal writing and pasting formatted text. The Text tab displays HTML code. Stay in Visual unless you have been given HTML and know where it belongs.
Classic editor headings. Click inside the heading paragraph. Open the format menu that normally says Paragraph, then choose Heading 2. Choose Heading 3 for a subsection.
Classic editor lists and separators. Use the bulleted list button for parallel items. For a separator, use the horizontal line button. If the second toolbar row is hidden, use Toolbar Toggle to reveal more formatting controls.
Tables. In the block editor, use the plus button to add a Table block and choose the required rows and columns. Use tables for evidence indexes and comparisons. If your editor lacks table controls, ask the wiki editor for the supported method rather than changing plugins.
Check your work. Use actual list controls, not a string of typed punctuation. Preview to check spacing and readability.
Create and check clickable links
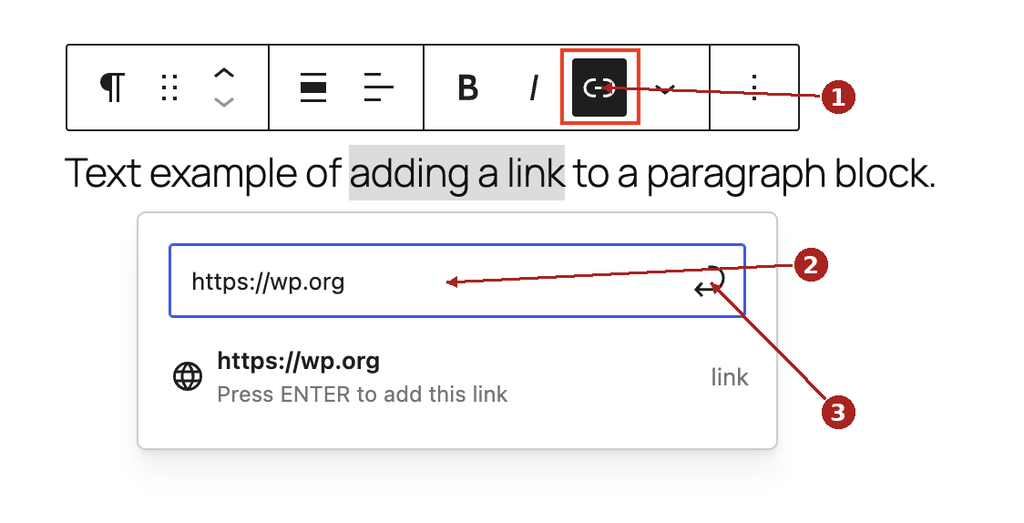
- Write a meaningful phrase at the opening of the sentence, such as The source document. Drag over that phrase to highlight it.
- Click the chain shaped link button. The shortcut is Ctrl+K on Windows or Command+K on a Mac while the text is selected.
- Paste the complete clean URL, including https://, into the link box. Press Enter or click the apply control. Click outside the link box to finish.
- For an internal link, open the relevant wiki article in another tab and copy its public URL. For evidence, copy the verified direct document address from epstein-data.com.
- Use Preview to test the link. It should open the correct article or evidence document. If it is wrong, select the linked text, open the link control, and edit the address.
- To remove a link but keep its words, select the linked text and use Remove link or the unlink control. Do not delete the whole sentence.
Check your work. The opening phrase should be clickable. No raw Markdown brackets should remain unless they are intentionally part of the text.
Apply the EpsteinWiki article template
Snapshot first. Explain the subject, its relevance, and the strongest documented findings. Organize the evidence sections under H2 headings. Include evidence IDs, important points, and key takeaways.
Evidence. Read the underlying records. Check dates, participants, and context. Distinguish facts, allegations, reported claims, and inferences. A mention or association does not by itself establish wrongdoing.
Links. Embed sources in opening words or headings. Never append a source link to the end of a sentence or paragraph. Include useful internal and external links. Remove tracking parameters, but retain anything required to locate the source.
Direct receipts. Use the verified document’s clean epstein-data.com address with its exact EFTA number. The pattern is https://epstein-data.com/EFTA followed by the document’s digits. Never guess an ID.
Near the end. Include open research questions, then a sources list with primary records and credited reporting. Add new receipts to that list whenever you update the body.
SEO last. The final SEO block contains only Meta description and Keywords. Keep private editing instructions out of the public article. Use plain readable paragraphs, bullets for lists, and no dashes in article prose.
Thorough coverage. Check documented aliases, timelines, related records, and relevant sleuth reporting. Do not describe the article as exhaustive in its metadata.
Check your work. The body starts with Snapshot, follows the existing topic template, and ends with the SEO information.
Update an existing article
- Open the article through Knowledge Base → All Articles. Read the current public version. Keep a separate copy of the proposed new text before editing.
- Find the section you need. The browser Find command is Ctrl+F or Command+F. Type a distinctive phrase, then close the Find box to resume editing.
- Click exactly where the new paragraph belongs. Add the information without replacing the whole article unless a full replacement has been agreed.
- Add the new evidence IDs and sources. Update the Snapshot, key takeaways, questions, and metadata when the new findings change their meaning.
- Keep the existing title, public URL, template, and still relevant categories. The slug field is not where you add SEO keywords.
- Preview the entire page. Check both the changed section and neighboring text. Coordinate with any other contributor editing the same article.
- When ready and authorized, click Update or the editor’s Save control. This can change the live article immediately. Core WordPress does not always offer a separate pending draft of changes to a published article.
Check your work. If an update needs review, send the proposed text to the wiki editor or use an installed revision review workflow. Do not change the live article’s status to Draft to create a review copy.
Understand the different keyword fields
The same subject can appear in several fields, but each field does a different job. Putting text in one does not automatically populate the others.
| Field or area | Purpose | Example |
|---|---|---|
| Title | The article headline | Zorro Ranch |
| Internal Links keywords | Phrases that point to this destination article | Zorro Ranch |
| Yoast meta description | Short search result summary | A factual summary of the records covered |
| Yoast Focus keyphrase | Optional analysis of one principal search phrase | Zorro Ranch records |
| KB categories | Groups for browsing the knowledge base | Relevant existing property or location categories |
| KB tags if enabled | Additional topic labels | A relevant existing tag |
| SEO Keywords line in body | The wiki’s editorial keyword list | Zorro Ranch, New Mexico, property records |
Check your work. A comma separated Keywords line is not a substitute for Internal Links keywords or a meta description in Yoast.
Add Internal Link Juicer keywords
Use these steps when the wiki’s linking plugin is Internal Link Juicer and its Internal Links panel is available for KB articles. The nickname JuicyLinks does not establish the installed plugin’s exact name.

- Open the destination KB article. For example, open the Zorro Ranch article if you want that phrase elsewhere to link here.
- Find Internal Links in the editor’s settings area. Click Keyword, type the specific phrase, then click Add Keyword.
- Check that the phrase appears under Configured keywords. Add documented name variants only when they identify the same subject.
- Save the article through the appropriate draft or update control. Avoid broad terms such as ranch or Jeffrey. They can create misleading links.
- After saving and any indexing completes, check another eligible public article containing the phrase. Confirm that the link leads to the intended KB article.
Check your work. If the panel or link is missing, ask the administrator to confirm KB article support, allowed content types, and permissions. Do not change global linking settings yourself.
Enter the meta description in Yoast

- In the KB article editor, open the Yoast SEO sidebar or scroll below the body to the Yoast box.
- Open Search appearance. In an older version, the comparable controls may be called Google preview or the snippet editor.
- Click Meta description. Paste only the summary text, not the words Meta description and not the whole SEO block.
- Use a concise, accurate summary of what the article contains. Aim for roughly 150 characters. Avoid unsupported claims or the word exhaustive. Check the length feedback and preview.
- Keep the same description in the article’s final SEO block. Enter it into Yoast too: a paragraph in the article body does not set the plugin metadata.
- Leave the existing SEO title template and published slug alone unless a change has been agreed. If using Focus keyphrase, enter one main search phrase, not the full keyword list. Save with the article.
Check your work. Example: Explore records, communications, property history, and open questions concerning Jeffrey Epstein’s Zorro Ranch in New Mexico.
Choose KB categories and optional tags
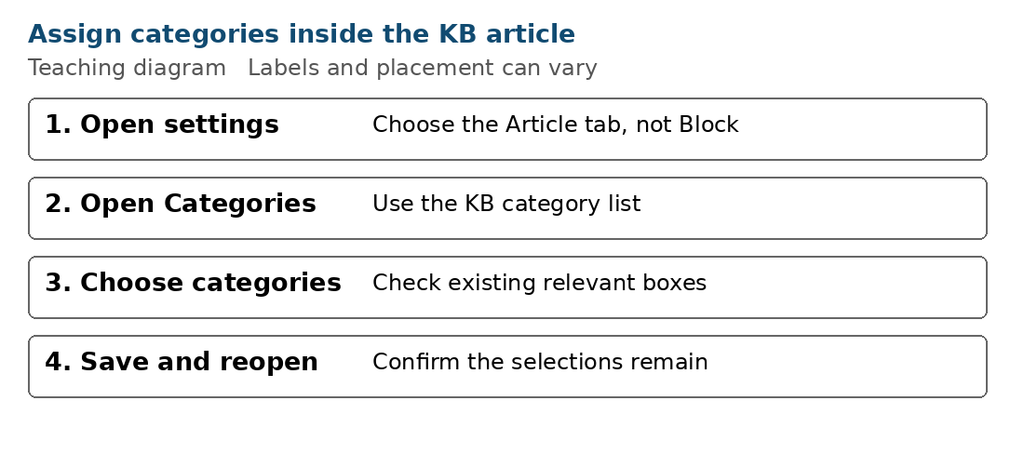
- Inside the article editor, open the settings sidebar. Choose Article rather than Block. In the classic editor, look for the category box beside the writing area.
- Open Knowledge Base Categories or the equivalent Categories panel for this KB article. Scroll through the existing categories or use its search field if present.
- Check the box beside each relevant existing category. Choose at least one suitable category. Base the choice on the article’s documented subject and scope.
- When updating, keep categories that still apply. Remove an incorrect selection by clearing its checkbox. Do not create a new category or alter the hierarchy without the wiki editor’s agreement.
- If KB Tags is available and used by the wiki, enter a relevant existing tag and select its suggestion or press Enter. Tags are optional unless the editor has specified them.
- Save with the article. Reopen the editor later and verify that the selected categories and any tags remain.
Check your work. Do not classify someone as a perpetrator or assign a criminal role based only on a name appearing in records.
Select or upload a featured image

- Have the approved article banner or picture ready on your computer. Confirm the person or place is correctly identified and that the image is suitable for publication.
- In the KB article settings, find Featured image. Click Set featured image. A media selection window should open.
- For an existing uploaded image, choose Media Library, search for its title if needed, and click its thumbnail. A checkmark should show which image is selected.
- For a new image, choose Upload files, then Select Files. Find the image on your computer, select it, and click Open. Wait for the upload to finish.
- Look at the selected image’s details on the right. Add the text described on the next page. Then click Set featured image at the bottom right.
Check your work. The media window should close and a thumbnail should appear in the Featured image panel. Inserting a picture into the body does not automatically set a featured image.
Add image text and verify the image
Alt text. In the selected image’s details, enter a short factual description of the visible image. For a real portrait, describe the portrait and verified identity. For a graphic, describe its subject and essential visible text. Avoid keyword stuffing.
Title. Use a clear identifying label. Caption can hold a visible credit when the layout displays it. Description can record provenance or rights information, but may not appear publicly. Put required credit in a visible location too.
Example for a graphic. If the image actually shows these elements: Archive themed banner titled Zorro Ranch with a photograph of the ranch building. An illustration should be identified as an illustration when relevant.
Important distinction. Alt text describes the image. It is not the article’s meta description. Changing an image’s details can affect other uses of that same Media Library image.
- After setting the image, save the article using its appropriate control.
- Open Preview and inspect the crop. Check that faces, article text, and essential details are visible.
- To change an unsuitable image, use Replace in the Featured image panel and choose the correct file. Remove featured image detaches it from the article; it does not mean permanently delete the media file.
Check your work. Use verified photos as photos and labeled graphics as illustrations. A generated banner is not evidence of an event.
Save a draft and preview your work

- For an unpublished article, click Save Draft after each completed section or group of changes. Wait for the confirmation. Do not rely only on autosave.
- In the block editor, find Preview or the View icon, often a monitor shape near the top right. Open its menu and choose Preview in new tab where available.
- In the classic editor, click Preview in the Publish box. Keep the editor tab open while reading the preview tab.
- Read the preview from beginning to end. Check title, headings, separators, paragraphs, bullets, tables, and featured image. Test the internal and evidence links.
- If your preview offers device widths, check desktop and mobile. This helps catch narrow tables and unreadable image crops.
- Return to the editor tab, fix anything wrong, and save the draft again. Previewing does not by itself mean that the article is public.
Check your work. For a published article, Save or Update may apply changes publicly. Do not use it as a private review save unless an installed workflow explicitly supports that.
Submit for review or apply public changes
Choose the action that matches the article’s current status and your assigned authority. The presence of a button does not tell you whether a particular article has completed editorial review.
- For a first new article, keep it as a draft until the wiki editor has checked it. Provide the title and draft location through your normal collaboration method.
- If your account offers Submit for Review, use it when the draft is ready. Some editors put Pending Review in the Status controls. Do not change a published article to Pending or Draft just to request review.
- If you are assigned to publish, run the final checklist. Click Publish, check the visibility and timing shown, and confirm publication if a second panel asks for it.
- For an already published article, use Update or the editor’s Save control when the changes are ready to become public.
- Wait for a success message. Open View Article or the public article link. Refresh once and check that the intended text and image are visible.
- Open the KB listing or relevant category and confirm the new article can be found there. If it is missing, check its publication status and category assignment with the wiki editor.
Check your work. A new draft should remain unpublished until it is ready. A completed public update should appear at the existing article URL.
Fix mistakes and missing controls
I changed the wrong text. Use Ctrl+Z or Command+Z immediately, or the editor’s Undo control. Check the result before doing anything else.
I saved a bad change. If Revisions is available for the KB article, open it and compare saved versions. Ask the wiki editor before restoring a whole older version, because a restore can replace other valid work. Revisions availability and what it stores depend on site configuration.
I cannot find categories or images. Open the settings sidebar and select Article rather than Block. Scroll through the panels. In the classic editor, check Screen Options. If still absent, ask about account permissions and KB support.
I cannot find Yoast or Internal Links. Check the sidebar and below the body. Exit distraction free mode if it hides panels. Ask the administrator to confirm the plugin and support for KB articles. Do not change global SEO or linking settings.
Another person is editing. Respect the editing lock and coordinate with them. Do not take over just to continue more quickly.
My sign in failed or the page reports cookies blocked. Follow the site’s message and contact the wiki editor if needed. Do not repeatedly submit credentials. Never send a password in an article or screenshot.
The save failed. Keep the editor open, copy your unsaved text to your working document, and check your connection. Do not close the tab until your work is protected.
Check your work. Before asking for help, note the article title, the missing control or exact error, and the step you were attempting. Omit passwords and private record details from screenshots.
Complete a practice exercise
This exercise practices the editor without creating public research claims. Use a temporary new KB draft and tell the wiki editor that it is a training exercise. Do not publish it.
- Open Knowledge Base → Add New Article. Give the draft a clear title such as Contributor Practice. In the body, add an H2 Snapshot and one paragraph labeled practice text.
- Add a second H2 called Sources. Put a real Separator block between the two sections. Add a short bulleted list beneath the Snapshot.
- Create a link on the opening words EpsteinWiki homepage using https://epsteinwiki.com/. Preview and test it.
- Select a suitable existing KB category if the editor has provided one for training. Set an approved practice image and add accurate alt text.
- Write a short practice meta description in Yoast. Locate Internal Links and identify Keyword, Add Keyword, and Configured keywords. Do not add broad practice words to the linking system.
- Save Draft, preview it, and reopen it from All Articles. Confirm that the formatting, link, category, metadata, and featured image persisted.
- Ask the wiki editor to check the draft and show you the approved publishing or update workflow before your first real assignment. Let the editor decide how to remove the training draft.
Check your work. You have completed the exercise when you can find the saved KB draft again and explain which button would make it public.
Use the final checklist
Before you publish a new article or apply a live update, check each item. For a draft handed off for review, use the same list to explain what is ready.
- The item is a KB article, and the subject does not duplicate another entry.
- The title and Snapshot match the documented subject. All planned sections are present.
- Claims are checked. Allegations and inferences are labeled. Evidence IDs are exact.
- Internal and external links open the intended sources. Link text is in opening words or headings.
- The article has actual H2 headings, real separator lines, readable paragraphs, and proper lists.
- New evidence is in the sources list. Sleuth reporting is credited when used.
- Relevant existing KB categories are selected. Optional tags follow the site’s practice.
- Internal linking phrases are specific and correctly configured where the plugin is supported.
- The meta description is entered in Yoast. The final SEO block has only meta description and keywords.
- The featured image is approved, accurately identified, readable, and has appropriate alt text.
- For an update, the public URL and established template are preserved.
- The article has been previewed. Required editorial review is complete. After saving, the public result or saved draft has been checked.
Check your work. A readable, sourced article with working links matters more than making every plugin indicator green.
Sources
- Echo Knowledge Base article navigation
- WordPress block editor controls
- WordPress heading controls
- WordPress lists
- WordPress separators
- WordPress link controls
- WordPress article settings and media selector
- WordPress previews
- WordPress revisions
- WordPress classic editor controls
- Internal Link Juicer keyword controls
- Internal Link Juicer allowed content types
- Yoast meta description instructions